Introduction
This project aims to provide a cheap and simple way to set up and run an Immich instance, empowering you to move away from BigTech without needing a computer degree. Having said that, you will be running your own server which will require an understanding of some basic concepts. This project attempts to provide sufficient documentation and explanations to help you on your way to regain sovereignty over your personal data.
The primary setup described aims to protect against the following treats.
- Third-party companies accessing personal media assets.
- Remote internet access of server and data. Requires small overhead maintaining OS updates.
- Access from local network. Requires setting strong passwords.
- Physical access to external storage and RPi SD card. Requires encryption of external drive.
There are alternative setup procedures to the main setup that address different requirements. References to these deviations will be made in the main setup procedure. Hence, you are encourage to follow the main setup procedure for all alternatives.
Caution
You will be taking back control of your media assets. You will be solely responsible for keeping them safe and accessible. This process requires a number of credentials to be created, without which no one, including yourself, can get access to this data.
Ensure that these credentials are stored securely. All instances where important credentials are created contain a similar caution note. Below is a summary of all the necessary passwords. You are encouraged to generate and store them in your password manager before proceeding.
Password Step notes External disk encryption 1 RPi login 2.6.3 Immich database 3.1.6 A-Za-z0-9 Immich admin user 3.4 Backup data encryption 4.2
Note
The following instruction have been devised and tested on a Linux based OS. Instructions for other OSs may be incomplete. If you want to follow along on a Linux based OS, you can run one from a live USB without installing it on your machine.
The big picture
The diagram below describes the architecture of the immich RPi server and how different parts of the system communicate.
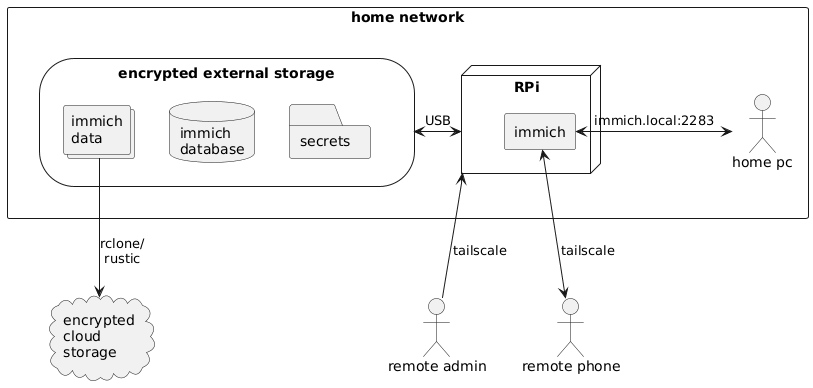
Glossary
- Raspberry Pi (RPi): A small and cheap single-board computer.
- Immich: The code that runs on the RPi providing photo management features.
- External drive: A Solid State Drive (SSD) or Hard Disk Drive (HDD) with a USB interface.
- Cloud storage: A storage service provided by third parties such as Proton Drive, Backblaze, GCP, AWS, etc.
rclone/rustic: Programs that facilitate backups to cloud storage.tailscale: VPN that allows the server to be reachable from anywhere.
Requirements
- A Raspberry Pi 4 (min 4 GB RAM) + micro SD card. Not tested on RPi 5.
- Raspberry Pi power supply.
- External storage, enough to hold all your Photos and Videos (assets).
- A cloud storage service - used for backups.
- Optional:
- Screen, keyboard and mouse available to connect to the RPi. RPi has a micro-HDMI connector.
Costs
| Item/service | Cost |
|---|---|
| RPi | ~ £ 50 |
| External drive | £ 40 - 100 |
| Cloud storage | £ 1 - 4 / month |
| Immich | Free but purchasing supports its development (£25) |
rclone/rustic | Free |
tailscale | Free |
Setup
The following steps setup a RPi immich server with no media assets. Following this, you may migrate photos from your previous app.
Important
If you have a large amount of assets to migrate, the RPi may have a hard time processing the migrated assets. Immich runs CPU intensive encoding and AI algorithms on your assets. This may cause your RPi to overheat and power down.
One solution to this is to install a heat sink and manage jobs in the
Administration > Jobspage. A better solution is to setup a temporary immich instance on a more powerful machine to import and process photos before setting up the RPi. You can follow the Migration Processing Off RPi setup steps for this solution.
Encrypt external drive
We encrypt the external drive to stop anyone gaining physical access to our drive from being able to see all our media assets. If this is not a concern, you can skip this step. I would encourage you to listen to Darknet Dairies episode #163: Ola before choosing to do so.
We need to create a LUKS encrypted drive with an ext4 file system. On Linux, we can use the file manager GUI tools to create this encrypted drive.
If you prefer using the terminal or are using the Windows Subsystem for Linux (WSL2), continue reading the command line instructions below. If you are running from the Windows Subsystem for Linux (WSL2), there may be some preamble to get things started. You can read more about this here.
Caution
Securely store the encryption password. If you loose it you will loose access to all the files stored in this drive.
Command Line Encryption
- Identify the path to your drive, similar to
/dev/sdc.- You use
lsblkto list all the available drives and their path.
- You use
- Use
cryptsetupto encrypt the drivesudo cryptsetup luksFormat <drive path> --type luks2 --cipher aes-xts-plain64 --key-size 512 --hash sha512 --iter-time 5000 --use-random - Plug and decrypt the drive
sudo cryptsetup open <drive path> immich_drive - Create the file system
sudo mkfs.ext4 /dev/mapper/immich_drive
Command Line Decryption
- Plug in the drive and identify it’s path, similar to above.
- Decrypt the drive
sudo cryptsetup open <drive path> immich_drive - Mount the drive
sudo mount /dev/mapper/immich_drive /mnt/immich_drive
Raspberry Pi setup
This project uses the declarative Linux operating system (OS), NixOS. This allows us to bring the system into the required state from configuration files maintained in this repository without the hassle of manual installations.
Note
NixOS will not be running on an encrypted drive. This is to allow the possibility of remote bring up if the server reboots. However, all secrets and assets will be stored on the encrypted external drive.
- Download the latest image from the releases page.
- You may choose to build the RPi image locally or
- Start from the latest vanilla NixOS image.
- Flash the RPi image on to an SD card using your favourite flashing tool;
rpi-imager,balena-etcherordd:sudo dd if=<path to image>.img of=<path to drive> bs=16M status=progress oflag=dsync - Plug-in an Ethernet cable.
- Place the SD card in your RPi and power it.
- Login to the RPi from your machine with
ssh admin@immich.localand passwordtesting.- If you have issues using
immich.local, identify and use the RPi IP withsudo arp-scan -l. - The first time you login you will be prompted to configure zsh. You can use option
0.
Note
Alternatively, you can connect a screen, keyboard and mouse and login to the RPi that way with the user
adminand passwordtesting. - If you have issues using
- Once logged in the RPi
- Change the default password:
sudo passwd adminCaution
This password is necessary to manage the RPi. If this is breached, attackers can access all of the raw media assets. Set a secure password and for better security, setup SSH keys and disable password authentication.
- Clone this repository:
git clone https://github.com/hicklin/immich-rpi-nix.git - Create a symbolic link (shortcut), for NixOS configuration:
sudo ln -s ~/immich-rpi-nix/configuration.nix /etc/nixos/configuration.nix - Update channels:
sudo nix-channel --update - Update the OS:
sudo nixos-rebuild switch
- Change the default password:
Immich setup
We will finish setting up immich, install the companion app on our phone and access the server from a web browser. For now, we will only be able to access immich from devices on the same network. We will enable remote access in step 5.
Raspberry Pi
Immich is already installed and configured on the RPi, however it requires a secrets file to operate. Follow these one-time steps to set this up.
- Create a mount location for the external drive.
sudo install -d -m 755 -o ${USER} -g users /mnt/immich_drive - Identify the path to the drive with
lsblk. The path is/dev/<name>where<name>is the first column oflsblk. E.g./dev/sdaor/dev/sda1if partitioned. - Decrypt and mount the external drive.
immich-server --immich-drive /dev/sda - Create a
secretsfolder in the encrypted drive.install -d -m 755 -o ${USER} -g users /mnt/immich_drive/secrets - Copy the example secrets file to your encrypted drive.
cp ~/immich-rpi-nix/immich-secrets.example /mnt/immich_drive/secrets/immich-secrets - Change the
DB_PASSWORDvalue in/mnt/immich_drive/secrets/immich-secrets.Caution
Securely store the
DB_PASSWORD. This is necessary to recover the database which is essential to make sense of our backup. - Create the directory for immich postgres database in the encrypted drive with the correct permissions.
sudo install -d -m 750 -o postgres -g users /mnt/immich_drive/postgres - Create the directory for immich data in the encrypted drive with the correct permissions.
sudo install -d -m 755 -o immich -g users /mnt/immich_drive/immich_data - Start immich
immich-server --start --no-decryption - You can use
journalctl -u immich-server -fto follow the logs from the immich service.
Phone app
- Download the immich app from https://immich.app/.
- Set the server URL to
http://immich.local:2283. If you have issues usingimmich.local, identify and use the RPi IP withsudo arp-scan -lor from the RPi withip addr show. - For more information about using the app, consult the immich documentation.
Web app
In your web browser type http://immich.local:2283. If you have issues using immich.local, identify and use the RPi IP with sudo arp-scan -l or from the RPi with ip addr show.
Immich initialisation
Upon first access, you will be prompted to setup the admin user.
Caution
Securely store the admin credentials.
Configure backups
It is essential that we backup our assets. Our drive may fail, get damaged or stolen and we don’t want this to result in the loss our precious memories.
The most resilient backups are cloud storage services. However, we want to ensure that our data is encrypted and only accessible by us. To achieve this we have two options; use a trusted end-to-end encryption and zero-trust storage service or encrypt the data ourselves.
If you are embarking on this project, you are likely a secure conscious individual and may already have Proton Mail. The paid plan comes with 500 GB of Proton Drive which is an end-to-end encryption and zero-trust storage service. Unfortunately, Proton Drive do not currently provide a robust solution for Linux. If you are interested in trying to use this, read Proton Drive Backups.
We will use rustic to encrypt and archive our data on non-zero-thrust services like Backblaze, GCP, AWS, etc, achieving a similar security posture to Proton Drive. rustic is a fast and secure backup program. It encrypts and syncs our data to a remote location.
We need to backup the following essential directories from /mnt/immich_drive/immich_data/
library: Used if storage templates are enabledupload: all original assetsprofile: user profilesbackups: database backup
Tip
You can configure the frequency and retention of database backups. For more information consult the immich docs.
Just uploading these directories will require immich to regenerate thumbs and encoded-videos during recovery. By default, both essential and generated data is backed up. This ensures a seedy and smooth recovery. If you wish to only backup essential files, set the IMMICH_BACKUP_ESSENTIAL_ONLY environment variable in configuration.nix to "true". Remember to follow this up with sudo nixos-rebuild switch.
1. Setup a storage provider
Choose a cloud storage provider compatible with rustic. You can find a list of supported backends here. I recommend using backblaze. It’s a pay-as-you-go service with reasonable cost per TB and it is fully supported by rustic.
Follow the instructions by the could storage provider to setup a storage bucket and generate an application key.
2. Configure rustic
Rustic requires a .toml configuration file with credentials to access your storage service and repository. In this context, repository refers to the stored encrypted data. You can find the latest configuration file example for backblaze and other services here. Create a copy of the relevant example in /mnt/immich_drive/secrets and update the values with information from your cloud storage provider.
Caution
The password in
[repository]is what’s used to encrypt/decrypt the backup data. Do not loose this otherwise you will not be able to access your backup data.
The contents of this config contains all the necessary information to access your private data. Hence, it’s important to keep this secure. To do this, we will store this file in the secrets directory in the encrypted drive and link it in the required directory.
- Create the dir for the rustic configuration.
sudo install -d -m 755 -o ${USER} -g users /etc/rustic - Link the rustic configuration to the required location.
ln -s /mnt/immich_drive/secrets/rustic.toml /etc/rustic/rustic.toml
3. Initialise the repository - One time
This step initialises the backup location (the cloud bucket) for rustic. We only need to run this once.
rustic init
4. Manual backup
The nix configuration provides a service for backing up data.
sudo systemctl start immich-backup
This service will run once and will encrypt and backup our data. You can check the logs for this service with:
journalctl -xeu immich-backup.service
To monitor the progress of the backup use rustic repoinfo.
5. Schedule backups
Our nix configuration schedules backups to start 60 minutes after boot and again every day. If you wish to modify this, you can amend systemd.timers."immich-backup" in configuration.nix.
Remote Access
5. Remote Access
The immich server is now set but we can’t access it from outside our local network. To access photos from outside the local network while keeping the server inaccessible to everyone else, we will create a Virtual Private Network (VPN) using tailscale.
Tailscale allows us to create a VPN that behaves similar to our local network, i.e. all devices on the same VPN will be able to communicate with each other. You can read more about how tailscale works here.
- Create an account at https://login.tailscale.com/start.
- Register the RPi. Tailscale is already installed on the RPi. To register the RPi, call this command and follow the URL output.
sudo tailscale up - Install the tailscale app on you phone: https://tailscale.com/download.
- Register your phone from the tailscale app.
- Install tailscale on other remote devices and register them in a similar way.
The tailscale dashboard shows all devices registered on your VPN. To access immich remotely from a device connected to the same tailscale VPN, replace immich.local, or the RPi local IP, in the immich phone or web setup with the tailscale IP or magic URI for the immich RPi, obtained from the ADDRESSES column.
Note
Tailscale will need to be running on devices outside the local network wishing to access immich.
Tip
The immich app can be set up to use the local IP when you are on the home WiFi and switch to the tailscale IP otherwise. To do this go to
user icon (top right) > Settings > Networkingand enableAutomatic URL switching.
Management
Running a server requires at least a small amount of management and maintenance overhead. This chapter includes information about the management and ongoing maintenance of the Raspberry Pi immich server.
Migrating Photos
If you are migrating from other photo management services, have a look at immich-go for automation.
Caution
immich-go is still an early version. Make sure to confirm that correct and full migration is achieved.
Important
If you have a large amount of assets to migrate, the RPi may have a hard time processing the migrated assets. Immich runs CPU intensive encoding and AI algorithms on your assets. This may cause your RPi to overheat and power down.
One solution to this is to install a heat sink and manage jobs in the
Administration > Jobspage. A better solution is to setup a temporary immich instance on a more powerful machine to import and process photos before setting up the RPi. You can follow the Migration Processing Off RPi setup steps for this solution.
On boot
Since we have an encrypted drive, and since we do not want the password to exist on the unencrypted OS memory, we have to manually input it after boot. This project provides a helper script as part of the nix configuration called immich-server. After boot call
immich-server --start --immich-drive /dev/sda
This script will first ask you for your user password then ask you for the immich drive decryption password.
Note
Your drive may be in a different location than
/dev/sda.
Note
If you opted out of an encrypted immich drive, you can enable immich to start on boot by removing
systemd.xxx.xxx.wantedBy = lib.mkForce [];lines inconfiguration.nix. Remember to runsudo nixos-rebuild switchafter commenting it out. You may still need to automate mounting the drive to/mnt/immich_drive.
Maintenance
You will need to perform some minimal maintenance procedures to ensure that the system continues to operate securely.
OS updates
For security purposes, it is important to maintain up-to-date software. To update packages in NixOS run
sudo nixos-rebuild switch --upgrade
Alternatively, we can setup automatic updates by adding the following snippet to our configuration.nix.
system.autoUpgrade = {
  enable = true;
  allowReboot = false;  # Setting to false otherwise we'll need to manually start the server.
  dates = "02:00";
  randomizedDelaySec = "45min";
};
Important
This may cause failures when you least expect it. If you experience an issue after an update, you can roll back to a previous build with
nixos-rebuild --rollback switch. You can read more aboutnixos-rebuildcommands here.
Check backup logs
Periodically check the backup logs to ensure that the backup application is still working. Run the following command and check that the last log is successful and within 24 hours.
journalctl -eu immich-backup.service
Disaster recovery
This chapter covers recovering your immich setup from backups. These instructions cover two distinct situations.
- Recovery From Cloud Storage: Setting up the external drive, RPi and getting data backed-up on cloud storage.
- Recovery From External Drive: The external drive data is intact and can be used as is. Setting up of RPi.
Recovery From Cloud Storage
- Encrypt the new drive following setup step 1.
- Setup the RPi following setup step 2.
- Setup immich following setup step 3, Raspberry Pi up to and including step 8.
- Stop the immich-backup timer from triggering.
sudo systemctl stop immich-backup.timer - Configure
rusticfollowing setup step 4, up to and including step 2. - Recover the data from the cloud. Note You can add
--dry-runto see what would be restored.rustic restore latest /mnt/immich_drive/immich_data - Restore the database from the latest backup in
immich_data/backups- Start postgres, the database
sudo systemctl start postgresql- restore backup
gunzip -c /mnt/immich_drive/immich_data/backups/<latest dump> | sudo -u postgres psql -d postgresImportant
If your database backups where created from a database with a user other than
immich, such as the default docker immich configuration whereDB_DATABASE_NAME=postgres, grant equivalent permissions toimmichas that user with:sudo -u postgres psql -c "GRANT <DB_DATABASE_NAME of old DB> TO immich;"- Ensure correct permissions to immich_data
sudo chown -R immich:users /mnt/immich_drive/immich_data - Start immich
immich-server --start --no-decryption - Access the server and confirm that the backup is complete.
Note
If you only backed up essential files, your RPi might need some processing time.
- Restart the immich-backup timer
sudo systemctl start immich-backup.timer - Run the following command and follow the URL output to register the RPi on tailscale.
sudo tailscale up
Recovery From External Drive
These instruction are for when the external drive already contains all the immich data of a previous server instance.
Caution
For this to work, the old and new postgres versions will need to match. There may be other nuances that might cause this to fail. If it does, you can always use the data in the drive to backup the database. You can follow the Migration Processing Off RPi procedure starting from step 8.
- Setup the RPi following setup step 2.
- Setup immich following setup step 3, Raspberry Pi up to and including step 3.
- Start immich
immich-server --start --no-decryption - Access the server and confirm that all the photos are there.
- Run the following command and follow the URL output to register the RPi on tailscale.
sudo tailscale up
Alternative setup procedures
This chapter contains alternative setup procedures. Alternative setup procedures heavily refer to the steps covered in the main Setup section. Content in this section is mostly intended to be referred to from the main setup section.
The alternative setup procedures covered are as follows:
- Migration processing off RPi: Describes a setup procedure where media assets are initially imported to and instance of immich running on a more powerful machine. This procedure is useful when there are a lot of assets to be imported as the RPi may be overwhelmed with the intensity of the processing tasks without manual management.
- Build RPi image locally: Describes building a RPi image on a local machine. This is useful for development.
- Setup RPi from vanilla NixOS image: Describes setting up the RPi from the latest NixOS image. These instructions are included mostly to document known nuances with this process. This procedure in not actively used so instructions may get outdated.
- Proton Drive Backup: Brief indication of using Proton Drive for backups.
Run initial migration processing off the RPi
If there are a lot of files that need to be migrated, the initial CPU intensive processes might cause the RPi to overheat and shutdown. To avoid this, we will spin up an immich server instance on a more powerful machine, such as a laptop/desktop, using the same external hard disk used for the RPi. Media assets are then imported to this local server for processing. Once finished, we will use the external drive in our RPi server setup.
- Follow setup step 1 to encrypt the external drive.
- Mount the encrypted drive to your machine.
- Use
lsblkto get the mount point path to the drive. - Create a
.envfile containing the snippet content below.- Change the DRIVE_PATH the to mount point path of the external drive.
- Change the DB_PASSWORD.
Caution
Securely store the
DB_PASSWORD. This is necessary to recover the database which is essential to make sense of our backup.
# Connection secret for postgres. You should change it to a random password
# Please use only the characters `A-Za-z0-9`, without special characters or spaces
DB_PASSWORD=changeThisPassword

# The path to the root of your external drive
DRIVE_PATH=/run/media/<user>/immich_drive

# To set a timezone, uncomment the next line and change Etc/UTC to a TZ identifier from this list: https://en.wikipedia.org/wiki/List_of_tz_database_time_zones#List
# TZ=Etc/UTC

# The Immich version to use. You can pin this to a specific version like "v2.1.0"
IMMICH_VERSION=v2

# Do not change the following values
###################################################################################

# The location where your uploaded files are stored
UPLOAD_LOCATION=${DRIVE_PATH}/immich_data

# The location where your database files are stored.
DB_DATA_LOCATION=${DRIVE_PATH}/postgres_not_rpi

DB_USERNAME=immich # set to `immich` to match the hardcoded user set in the nix immich service.
DB_DATABASE_NAME=immich
Note
It may be possible to use the
UPLOAD_LOCATIONandDB_DATA_LOCATIONdirectories generated by your machine on the RPi. However, this is likely to be a smooth transition only if you are creating your immich instance on another NixOs with the same version of immich and postgres. - Follow immich instructions to setup an immich instance on your machine with the newly created
.envfile. - Migrate your photos and videos.
- Create a backup of the database.
- Setup the RPi server
- Setup the RPi following setup step 2.
- Setup immich following setup step 3, Raspberry Pi up to and including step 7.
Important
Use the same
DB_PASSWORDused in step 4 above. - Restore the database following Recovery From Cloud Storage steps 7 to 9.
- Configure backups following setup step 4
- Setup remote access following setup step 5
Build RPi image locally
If you are developing or want to modify the starting RPi image, you’ll want to build the image locally. Follow the relevant instructions for your system.
NixOS
- Enable QEMU emulation of
aarch64by adding the following to yourconfiguration.nixboot.binfmt.emulatedSystems = [ "aarch64-linux" ]; - Build the RPi SD image with:
nix build .#rpi-image
Note
This builds the initial RPi SD image using the
sd_card_configuration.nixconfiguration. This image has the bare necessities to get started, keeping it small. If you want to build the final image fromconfiguration.nix, updateflake.nixaccordingly before runningnix build.
Setup RPi from NixOS image
The recommended approach to setup your RPi for this project is the use the released images as part of this repository. If you are having issue with the release images or want to build your RPi starting from a plain NixOS image, you can follow these instructions.
Warning
This procedure in not actively used so instructions may get outdated.
These steps are simplified from this original source.
- Download the latest NixOS build for your RPi from Hydra.
- Flash on to an SD card using your favourite flashing tool.
rpi-imager,balena-etcherordd. - Choose one
- Wire a screen, keyboard and mouse to the RPi OR
- Wire the FTDI cable
- Connect the TX/RX wires to GPIOs 14 and 15.
- Plug the USB to you machine, noticing the port assigned to it. You can used
dmesg -w. - Use
picocom -b 115200 /dev/ttyUSB<X>to monitor the boot.
- Place the SD card in your RPi and power it.
- if using an FTDI cable, wait for a minute or so after
starting kernel...is printed and continue…- Enable UART
- Power off the RPi and remove the SD card.
- Mount the SD card back on you machine.
- Open
NIXOS_SD/boot/extlinux/extlinux.conf - Edit the
APPENDline by replacingconsole=ttyS0,115200n8withconsole=ttyS1,115200n8. - Save and unmount the SD card.
- Place the SD card back in the RPi and supply power.
- Enable UART
- Setup the OS
- Plug-in an Ethernet cable.
- Install git:
nix-shell -p git - Clone this repository:
git clone https://github.com/hicklin/immich-rpi-nix.git - Create a symbolic link (shortcut), for our NixOS configuration:
sudo ln -s ~/immich-rpi-nix/configuration.nix /etc/nixos/configuration.nix - Change the RPi login password by changing the
hashedPasswordinimmich-rpi-nix/configuration.nix
- You can generate a hash with
mkpasswd -m sha-512 <your secure password>. Note the space at the start. This omits this command from being logged in history and leaking your password.
Caution
This password is necessary to manage the RPi. If this is breached, attackers can access all of the raw media assets. Set a secure password and for better security, setup SSH keys and disable password authentication.
- Update channels:
sudo nix-channel --update - Install all necessary services and applications:
sudo nixos-rebuild switch - Now you can ssh into the RPi with
ssh immich@<IP>and the password set in step 5.
Proton Drive Backups
In a sensible world, you would be using Proton services as they offer private emails, calendar and drive solutions. In a sensible world, Proton would provide basic Proton Drive support for Linux. At the time of writing, they don’t!
If you are a proton customer or interested in becoming one, please email them about their lack of support for Linux and how this is effecting you. It might push them to officially support the most common OS on the planet, and probably in space.
If proton was supported with rclone
Proton drive support for rclone varies with time. Proton dose not officially support rclone and does not publish the Proton Drive API. Hence, the community is left reverse engineering Proton applications to add support to rclone. Apart form this, the amazing work of the open-source community is sometimes thwarted by Proton in such a way that requires Proton to fix. Hence, I can’t recommended the use of Proton Drive at this time, even if you are already paying for hundreds of gigabytes that you can’t use.
If you are reading this in the future, where hopefully the world has become a bit less silly, you might be able to use rclone to backup data to Proton Drive. Proton Drive has end-to-end encryption and zero-trust storage which would make it ideal for this task.
Optional Extras
The primary setup procedure sets up a secure immich server. This section contains optional additions to the base immich server. Some of these additions will further improve security others will enable new features.
Harden RPi with SSH keys
In this chapter we will harden the Raspberry Pi access through the use of SSH keys and disabling password login. This ensures that only devices with authorised SSH keys can access the RPi.
Setup SSH keys
If you do not have SSH key generated for your machine, generate them with:
ssh-keygen
Copy these keys to the RPi with
ssh-copy-id -i <path to key>.pub admin@immich.local
Now you can log into the RPi without needing typing the password.
Tip
If you have issues using
ssh-copy-idyou can manually copy your public SSH key to the~/.ssh/authorized_keyspath on the RPi.
Disabling password authentication
Locate and uncomment this code in configuration.nix.
  services.openssh = {
    # Disables remote password authentication.
    settings.PasswordAuthentication = false;
    # Disables keyboard-interactive authentication.
    settings.KbdInteractiveAuthentication = false;
  };
Caution
Once password authentication is disabled, only devices with the matching private keys will be able to access the RPi. Make sure to save authorised SSH keys in your password manager in case those devices fail.
Expose Immich to the internet
This chapter describes how to securely expose immich to the internet. This specific setup addresses two main issues with the main tailscale VPN solution:
- Sharing photos through share links with devices not on the tailscale network.
- Accessing immich without tailscale VPN; required to work with privacy VPNs on devices limited to one VPN instance, such as Android phones.
To enable these features securely, we will hide immich behind caddy, a reverse proxy. Caddy will only grant full server access to trusted devices with valid mTLS certificates. Caddy will allow untrusted devices to only access the share APIs. Caddy access logs will be monitored for failed login attempts and API scanning by fail2ban. Offending IPs will be banned.
Caution
Media shared through a share link can be accessed by anyone. Make sure to protect these share links with passwords when generated. You can manage shared links in Sharing > Shared links.
Important
Exposing immich to the internet inherently adds risk. This solution introduces as number of measures to mitigate these risks. If you choose to deviate from this setup, it’s important to understand how these measures work together to enable secure modifications.
The architecture
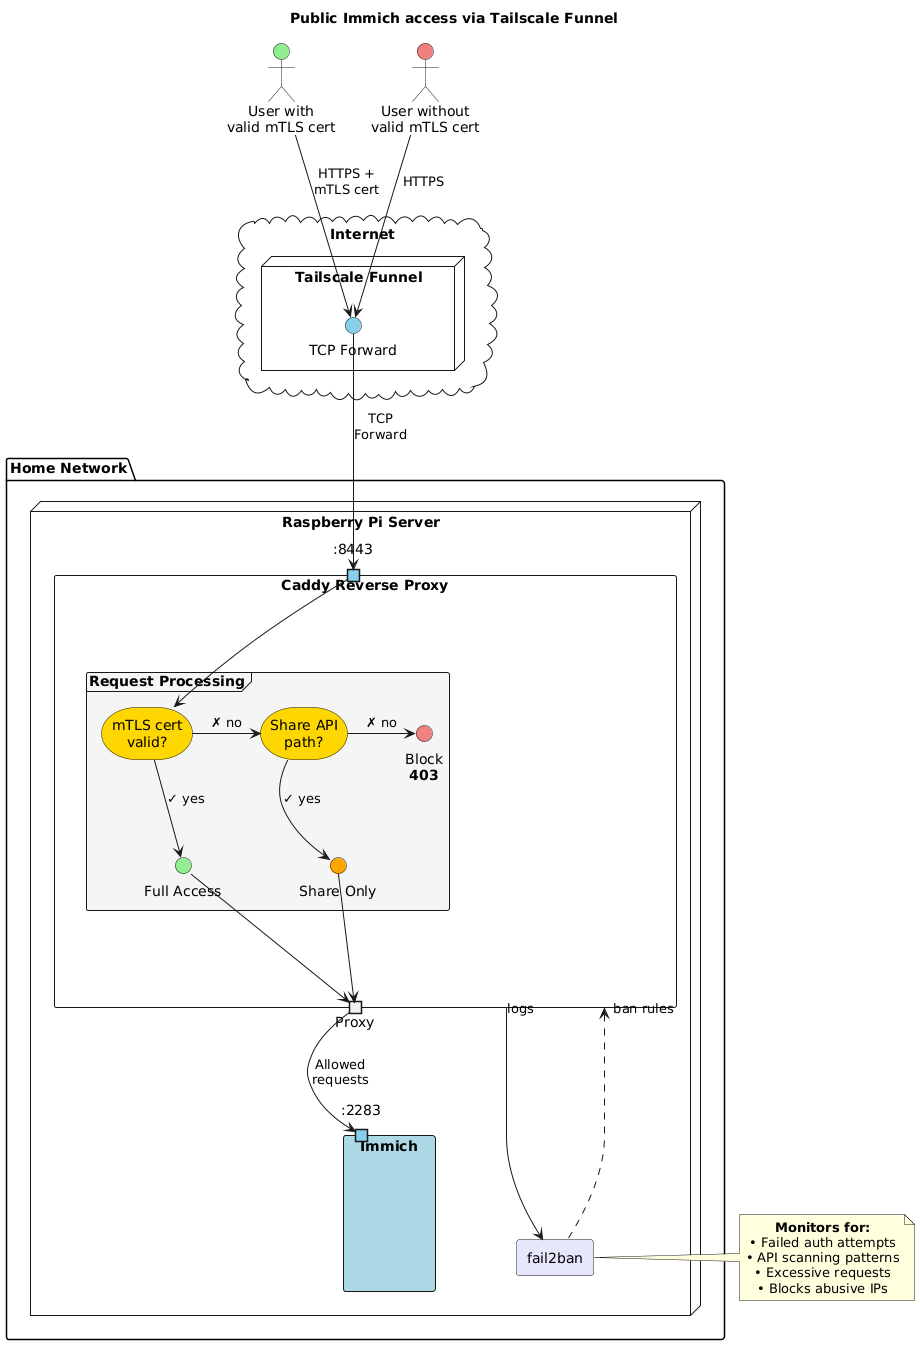
Glossary
- Tailscale funnel: A tailscale service that exposes the device URL to the public internet and forwards HTTPS requests to the device.
- Caddy: A reverse proxy service, filtering requests to the server.
- Fail2ban: Banning service. Bans abusive IPs.
- mTLS: Mutual TLS, enables mutual authentication between a client and a server.
Setup
1. Initial prep
- Export the certificate directory for use with the following commands.
export CERT_DIR="/var/lib/certs" - Create the certificates directory:
sudo install -d -m 755 -o $USER -g users $CERT_DIR
2. Server certificate
A server certificate allows secure HTTPS communication. We will use Let’s Encrypt server certificates generated by tailscale to avoid browser warnings caused by self-signed certs.
- Enable Let’s Encrypt certificate generation in tailscale: Dashboard > DNS > HTTPS Certificates > Enable HTTPS.
- Download the certs from tailscale:
sudo tailscale cert \
  --cert-file $CERT_DIR/cert.pem \
  --key-file $CERT_DIR/key.pem \
  $(tailscale status --json | jq -r '.Self.DNSName' | sed 's/\.$//')
3. Create a Certificate Authority (CA)
Create a certificate authority on the immich server that will generate mTLS certificates for trusted devices.
- Generate a private CA key:
openssl genrsa -out $CERT_DIR/ca-key.pem 4096 - Generate a self-signed CA certificate:
openssl req -new -x509 -days 3650 \
  -key $CERT_DIR/ca-key.pem \
  -out $CERT_DIR/ca-cert.pem \
  -subj "/CN=Immich Client CA/O=Personal/C=US"
4. Enable nix configuration
The reverse proxy, caddy, it’s filters and fail2ban described above are all preconfigured in the expose-immich.nix configuration file.
- Go to the
improtssection ofconfiguration.nix, comment out./lan-immich.nixand comment in./expose-immich.nix. - Rebuild. Note that caddy will fail to start until we run the next step.
sudo nixos-rebuild switch - Set owner of the certs directory to caddy.
sudo chown -R caddy:caddy $CERT_DIR - Restart caddy
sudo systemctl restart caddy
5. Open sever to the internet
Now that all the routing and filtering is configured, we can expose our server to the internet. Setup a tailscale funnel to forward raw TCP requests to caddy on port 8443.
sudo tailscale funnel --bg --proxy-protocol 1 --tcp 443 tcp://localhost:8443
Note
This setting is persistent across reboots. To turn off the tailscale funnel you can use
sudo tailscale funnel reset
6. Generate Client Certificates
Generate mTLS client certificates for trusted devices such as a personal computer or phone. This will grant them full access to immich. The expose-immich nix configuration provides a helpful script to generate these certificates.
sudo gen-mtls-certs --client-name <client-name>
This will generate
- <client-name>.crt: Client certificate
- <client-name>.key: Client private key
- <client-name>.p12: PKC12 bundle, required for phones and browsers
7. Install mTLS certs on your devices
Immich app
- Transfer the generated
.p12file to your phone. - Sign-out of the app.
- Enter the new https tailscale URL. DO NOT tap on login.
- Add your mTLS cert in setting (gear icon) > Advanced:
- Toggle “Allow self-signed SSL certificates”.
- Import the certificate it SSL client certificate.
Browser
Assuming a chrome based browser such as brave, chrome ect.
- Add .p12 cert to you browser at
brave://certificate-manager/clientcerts/platformclientcerts. - Access your server using the tailscale URL and select the certificate when prompted.
Monitor
The following are some helpful commands to monitor the system.
Caddy
- Caddy service logs:
journalctl -eu caddy -f - Caddy access logs can be found at
/var/log/caddy/.
Fail2ban
- Fail2ban service logs:
journalctl -eu fail2ban -f - For general fail2ban status summary:
sudo fail2ban-client status - For jail status summary:
sudo fail2ban-client status <jail>.<jail>can be one ofnot-found,unauthorisedorforbidden. - To unban an ip
sudo fail2ban-client set <jail> unbanip <ip>
Known Issues
This section describes know issues and how to fix them.
Kernel boot hangs after flashing
Sometimes, after flashing a fresh image onto the SD card, the boot hangs. If you have a screen connected, it might go blank about 14 s in to the kernel boot. If you have UART communication with the RPi, you’ll see no more logs after
[   15.201106] vc4_hvs fe400000.hvs: Couldn't get core clock
[   15.212233] platform fef05700.hdmi: deferred probe pending: (reason unknown)
Solution
Not yet sure why this happens but re-flashing the image onto the SD card fixes it.
Support This Project
This project is free and open-source. If you find it useful, consider supporting its development:
💝 One-time donation: Ko-fi / GitHub Sponsors
Your support helps:
- Keep documentation up-to-date
- Test new hardware configurations
- Respond to issues and questions
- Add new features
Every contribution, no matter the size, is deeply appreciated and motivates continued development.
Where the Money Goes
As a solo developer, funds support:
- Hardware for testing (Raspberry Pi models, drives, etc.)
- Time for maintenance and support
- Development of new features
- Keeping this project actively maintained
Alternative Ways to Help
Can’t sponsor financially? You can still help:
- ⭐ Star the project on GitHub
- 📢 Share with others who might benefit
- 🐛 Report bugs or suggest improvements
- 📝 Improve documentation
- 💬 Answer questions from other users